When it comes to electrical connections, nothing is more important than a secure, long-lasting crimp. A poorly crimped battery cable lug can cause voltage drops, overheating, or even total system failure. Whether you’re maintaining heavy equipment, assembling a custom vehicle, or keeping your fleet on the road, knowing how to crimp battery cable lugs like a pro ensures performance and safety.
Why proper crimping matters for battery cables
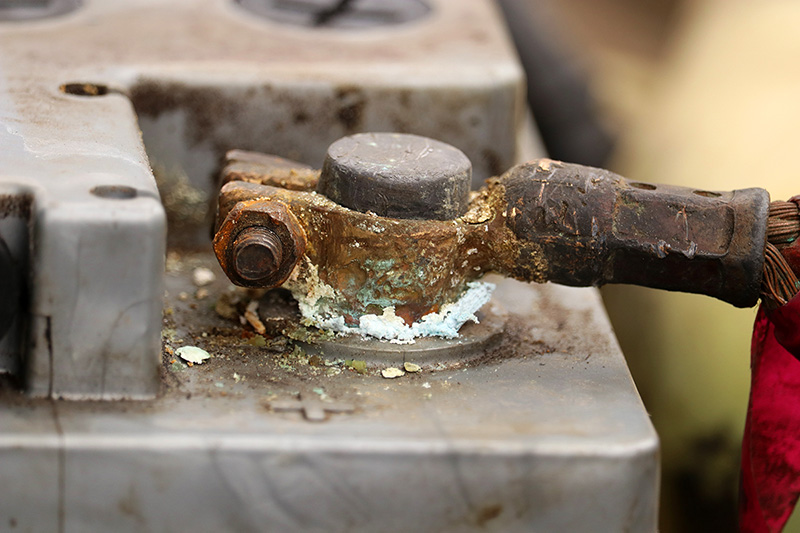
Battery cables carry high current loads. If the connection isn’t tight, you risk:
-
Heat buildup that can melt insulation or damage terminals.
-
Corrosion from loose connections that allow moisture in.
-
Reduced power to starters, winches, and hydraulic systems.
A professional crimp ensures maximum conductivity, long-term reliability, and peace of mind.
Tools you need to crimp battery cable lugs correctly
To achieve a factory-grade crimp, you’ll need:
-
Battery cables: Flexible, durable battery cables for the correct gauge and length.
-
Lug connectors: Lug connectors in bare copper or tinned copper for reliable connections.
-
Cutters & crimpers: Hydraulic crimpers or manual crimpers plus cable cutters for precision.
-
Heat shrink tubing: Heat shrinkable tubing to seal and protect your connections.
-
Battery connector accessories: Terminal protectors and booster cable replacement handles for added reliability.
Read: How to Assemble a Battery Cable
Step-by-step guide to crimping battery cable lugs
-
Cut the cable cleanly
Use sharp cable cutters for a straight, flush cut.
-
Seal with heat shrink
Slide heat shrink tubing over the connection for a watertight, professional finish. Ensure the heat shrink is not only large enough for the wire but will also cover the connection once it is complete.
-
Strip the insulation
Remove just enough insulation to fit the conductor inside the lug barrel.
-
Insert the cable into the lug
Select the right lug connector or stud connector and ensure all copper strands fit securely inside.
-
Crimp the lug securely
Position the lug in your crimping tool and compress until you achieve a solid, tight crimp.
-
Inspect the crimp
A good crimp will show full compression with no gaps.
Read: Step-by-Step Guide to Battery Terminal and Lug Selection
Common crimping mistakes to avoid
Even with the right tools and parts, battery cable connections can fail if they’re not crimped properly. Here are some of the most common mistakes we see, and how to prevent them:
-
Using the wrong lug size
A lug that’s too big or too small won’t compress properly, leading to poor conductivity. Always match your lug connector to the exact gauge of your battery cable.
-
Improper cable cuts
Frayed or angled cuts reduce surface contact. Use sharp cable cutters for clean, straight cuts every time.
-
Skipping heat shrink
Leaving a bare connection invites moisture and corrosion. Finish every crimp with heat shrink tubing or battery terminal protectors to seal it tight. Use the right heat shrink for the environment, if you are working in a high moisture or wet area use heat shrink with a sealant built in.
Shop Dual Wall Heat Shrink Tubing
-
Relying on pliers instead of a crimper
Pliers don’t apply even compression. Invest in a hydraulic crimper or manual crimping tool for professional results. This can also help you avoid injury.
-
Over-crimping
Crushing the lug can damage copper strands and weaken conductivity. Apply steady, even pressure until the tool bottoms out, then stop.
Avoiding these mistakes ensures your connections last longer, perform better, and keep your equipment running without interruptions.
Pro tips for long-lasting battery cable connections
-
Double-crimp larger lugs for maximum strength.
-
Use dielectric grease under heat shrink tubing for corrosion resistance.
-
Stock battery assortments to ensure you always have the right lug or connector on hand.
Get professional-grade crimping supplies at Royal Brass & Hose
Crimping battery cable lugs like a pro isn’t complicated, it’s about using the right tools, the right technique, and the right supplies. Need help finding the right solution? Our team is here to guide you. Contact us or visit one of our locations for more information.